|
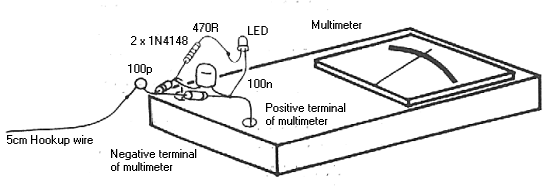
Notice: due to popular demand, we now supply these in kit form. They cost A$2.00 each. To get the most out of the Professional series FM Bugs, an RF meter is used to maximise output but seeing though the output of these devices is so small, convential RF power meters cannot be used and so we need an RF milliwatt meter. It uses a very simple circuit and a conventional multimeter to show the readings. Across the input is a LED and resistor and the degree of brightness of the LED along with the voltage reading on the multimeter, gives an indication of the energy level. A digital multimeter can be used but the presence of RF may cause false readings. To this extent, some analogue multimeters may get full scale deflections in the 15 and 250V ranges but the LED will never lie. What you will need:
Build the circuit up as shown below: 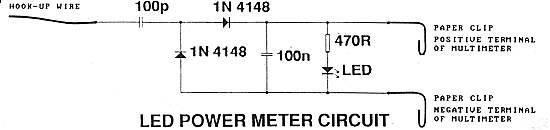
Make sure the input lead is exactly 5cm long. When dealing with RF, lead length is very important and if the input lead is longer, the meter will produce lower readings. Due to the different types of multimeters, we don't give any benchmark or test figures. To use the power meter, connect the input lead to the antennae point (do not fit the antenna lead yet) and switch the device on. Set the multimeter to either the 2, 2.5 or 5V range. Keep the transmitter away from the meter to prevent the movement being influenced by the RF and you should get a reading of about 2V. The LED will glow quite noticeably and you can see the output on the LED before the circuit is peaked. Next you have to tune the transmitter to a clear spot on the radio. For this part, you will need a transistor radio, preferably one with a tuning indicator. Keep the radio at least 2-3 meters away and tune to a clear spot. The lead of the power meter is used to radiate the the signal and you should get a range of about 10 metres. Turn the transmitter on and then adjust the turns of the tinned copper coils until you get a feedback whistle. There may be a number of spots where the signal occurs and it is important to pick the fundamental. The weaker side-tones have no range and this is where the tuning indicator on the radio becomes important. It will quickly indicate the fundamental frequency. Move the radio away to confirm the that the fundamental is being detected. Once the transmission frequency has been set, the peaking of tuned circuit must be undertaken. This is done by squashing or stretching the turns of the 6 turn coil and as you do this, you will be able to see the effect on the LED Power Meter. This way, the output stage can be optimised and you can be sure that maximum output has been gained. (adapted from Security Devices, 1989 by C. Mitchell) |
| Home | Electronics Kits | What's New? | Ordering | Freight | FAQ | Contact Info | Support | Site Map |
This page was last modified on the 31st March, 1999 by
Ian Clarke.
© Copyright 1998 - 1999, KitZ